You’ve installed Ubuntu on your PC alongside Windows in a dual-boot arrangement.
But for some reason, things didn’t go too well. Perhaps you ran into some bugs, or perhaps you just didn’t feel ready to migrate from Windows to Linux.
Now you’ve got a bit of a problem: a Linux partition on your PC’s hard disk drive, taking up space that you need for your Windows files and folders (or perhaps another attempt at dual-booting Linux).
In short, you need to uninstall Ubuntu from your PC. How can you do that safely, without losing data from Ubuntu or Windows?
What Is Dual-Booting Linux?

As a brief explainer, dual-booting is the act of installing two operating systems into separate partitions on a hard disk drive. This can be useful for migrating from one operating system to another (for instance, from Windows to Linux).
It’s also valuable if you use one OS for some tasks. (You might have a Linux PC at home but use Windows at work).
While a virtual machine is one way to enjoy multiple operating systems on one PC, dual-booting is more flexible. Both options have their strengths and weaknesses.
Be aware that you can go beyond dual-booting. If you had also managed to install macOS on your hardware, then you could describe this as “multibooting.” The same term applies to multiple versions of Windows or Linux, too.
Preparation: Back Up Your Files!

It doesn’t matter how long you’ve been using Linux. There will almost certainly be a couple of files you want to retain. The answer, of course, is to back these up.
How might you back up data on a Linux partition? One way is to use the standard backup tools found in Ubuntu. Other Linux operating systems also ship with backup tools. You’ll also find backup utilities that can be installed from your distribution’s package manager.
You might also opt for a more straightforward solution. Installing the Dropbox client on your Linux OS and syncing your data to the cloud would be enough. Alternatively, resort to a removable USB drive.
It’s even possible to use the Linux file manager to copy and paste your personal files from Linux into the Windows partition. Ensure you save the data in an easy-to-find location, with a clearly labeled directory name, for ease of discovery.

Should you find that things go wrong and you can’t boot into Linux to recover your data, you can use a Windows tool like DiskInternals Linux Reader to read the ext2 or ext3 file system and recover your files.
Given that we’re going to be deleting data from the HDD, for complete data safety, it’s also worth making sure that you have a recent backup of your personal data from the Windows partition.
Uninstalling Ubuntu: Remove the Linux Partition
Once you’re happy that you have retrieved the data you mean to keep from your Ubuntu partition, just delete it.
It really is that simple. Boot into Windows and open Computer Management. You’ll need admin privileges for this, so if yours is the main account on the PC, that should be fine. If not, you’ll need to make some changes to your account, or login as admin.
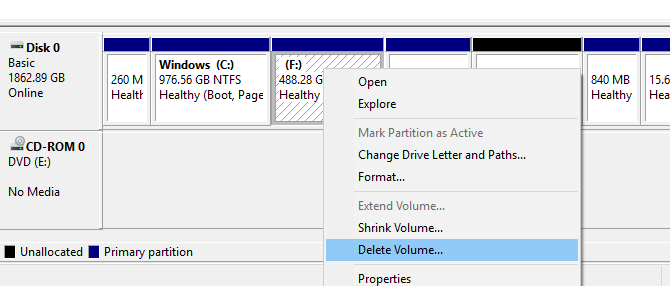
Next, right-click the Start button, and select Disk Management. Here, you’ll see your partitions listed. You’ll need to identify the Linux partition; you can double check this by using the DiskInternals tool.
You should also be aware of the partition size and be sure that this matches the size of the main storage device when you’re running Ubuntu.
Avoid deleting any partitions that you need!
Once you’re certain, it’s time to delete the Ubuntu partition. Right-click the partition and select Delete Volume.

This simple action will effectively uninstall Ubuntu from your PC. The GRUB 2.0 bootloader will also be gone, which means no more operating system selection screen.
However, it also means that there is no means to boot the remaining OS.
How to Restore the MBR (Master Boot Record)
To get around this, you need to restore the Master Boot Record, or MBR. You have a couple of options here:
- Use Windows to repair the MBR.
- Employ a third-party tool, such as Hiren’s Boot CD. This option is best if you’re not using Windows 10.
We’re going to focus on using Windows 10 to repair the MBR.
Begin by downloading the Windows 10 installation files. This is legal if you’re using a legitimate copy of the OS. Use this to create a bootable USB or DVD.
Next, insert the disc, restart the computer, and tap the correct key to enter the BIOS to change the settings. (This differs depending on the manufacturer of your computer). The aim here is to ensure that the computer boots from the Windows 10 installation disc.
Restart to boot from the installation disc and click Repair Your Computer. Next, select Troubleshoot > Advanced Options > Command Prompt. Here, we use the Bootrec.exe tool using the fixbbr command.
First, enter:
bootrec /fixmbr
This will clean things up. Follow it with:
bootrec /fixboot
FixBoot is used when a non-Windows boot record has been removed.
At this stage, you can finish off with:
bootrec /scanos
This command scans the HDD for suitable operating systems. If you’re using Windows 10 alongside another Windows OS, it will be detected here. If you’re having problems with this, try
bootrec /rebuildbcd
At this point, you’re done. But if Windows doesn’t boot when you exit the command prompt and restart your computer (remembering to reselect the original boot disk in the BIOS), then you’ve got problems.
You can fix this by reinstalling Windows 10, but first try the recovery partition. This is a portion of your Windows 10 hard drive that is dedicated to recovering your PC.
Reclaim or Reuse the Free Space You Now Have
You’ll now have a chunk of free space. To use this, it will need partitioning and formatting.
If you don’t know how to do this, simply run Disk Management as described above. Select the empty space, right-click and choose the New Volume… option that suits your requirements.
Alternatively, right-click the volume next to the empty space, selecting Extend Volume to increase the size of the partition. This video will help:
Reclaimed by Windows, this space can now be accessed via a new drive letter. It’s available for whatever you want to store on it: personal data, games, videos, or anything else. Everything is back to normal!
Still need to use Linux from time to time? Why not install Linux inside Windows using the Windows subsystem for Linux software in the Microsoft Store?
Read the full article: How to Safely Uninstall Ubuntu From a Windows Dual-Boot PC
from MakeUseOf https://ift.tt/2XLmw2H

No comments:
Post a Comment