Setting up a Raspberry Pi usually means writing the disk image to a microSD card, then using it to boot the operating system.
It’s a good flow that works in most cases… but it’s not the only option. Now you can use network boot to run your Raspberry Pi, and forget about microSD cards completely!
MicroSD, USB, or Ethernet? For Raspberry Pi
Traditionally, running a Raspberry Pi has meant writing the disk image of your preferred distro to microSD. This is usually done using a tool like Etcher (although Linux and macOS users can access command line tools for writing data).
Having a fast, resilient microSD card is important, but even the best devices suffer performance degradation, and eventually fail. Keeping a backup of the microSD card is a good idea, so that you can instantly copy the image to a new card.

One alternative is to boot from a USB device instead, but with the release of the Raspberry Pi 3 B+, things have improved. Now you can boot multiple Raspberry Pi’s over Ethernet, from a central server. This uses Preboot eXecution Environment (or PXE, pronounced “pixie”) and is known as network booting (or “netboot”). It’s made possible thanks to a new feature in Raspbian, PiServer.
PXE has been a common feature in desktops and servers for years, although it’s usually used in corporations and public institutions. For Raspberry Pis in schools or businesses, using piServer, there’s no need to install the operating system on each Pi—instead, a single server runs the Raspbian x86 distribution as a server, and each Raspberry Pi acts as a client (a zero, or ultra-thin client, specifically) booting from the OS on the server. This is an excellent way to control what is installed on each Raspberry Pi (it’s all hosted on the server), and monitor how they’re used.
What You’ll Need to Use NetBoot on Raspberry Pi
Setting this up is pretty straightforward. However, PXE doesn’t work on older Raspberry Pi’s, only the 2018 model, the Raspberry Pi 3 B+.
Along with this, you’ll need a desktop computer or laptop, or some other suitable device to run Raspbian x86. You’ll also require:
- Raspbian Lite
- MicroSD card
Both of these are required for configuration of PXE, but once this is done, the microSD card can be repurposed.
How to Set Up a Raspberry Pi Server
With Debian Stretch with Raspberry Pi Desktop (the official name for Raspbian x86) downloaded, you have several options. It can be run as a live disc from DVD-ROM or USB; alternatively, you could install it as a virtual machine using VirtualBox. If you’re planning on using a dedicated machine, meanwhile, then a full installation will be appropriate.
While it is possible to use a Raspberry Pi running Raspbian as the server, this will result in slower performance.
Regardless of which solution you choose, ensure there is enough HDD capacity for each Raspberry Pi on the network. With the system set up, boot Raspbian x86.
How to Configure a Raspberry Pi Client
You should now be ready to configure your Raspberry Pi 3 B+. You should have written the OS to your microSD card already, so ensure this is inserted in the Raspberry Pi and boot the computer.

Open a command line (or connect via SSH) and input:
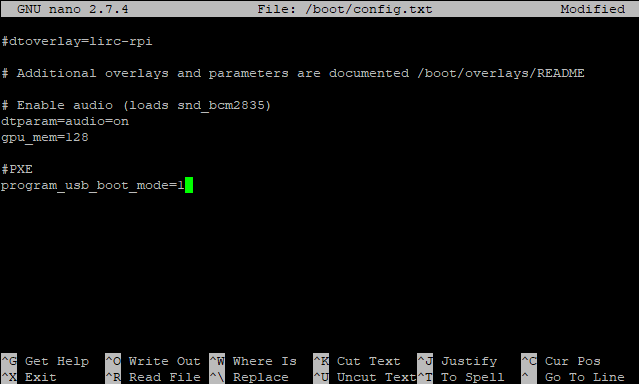
sudo nano /boot/config.txt
With the file open in the text editor, add the following to the end of the file:
program_usb_boot_mode=1
Save the file and exit with Ctrl+X, then power down the Raspberry Pi:
sudo shutdown
You can now remove the microSD card.
Note: You can save time with the above process using this all-in-one command:
echo program_usb_boot_mode=1 | sudo tee -a /boot/config.txt
However, you will still need to switch off the computer.
How to Boot Your Raspberry Pi Over PXE
With an Ethernet cable connected to your Raspberry Pi 3 B+, you’re ready to connect the power supply and boot. At this stage, nothing much will happen, other than the power LED lighting up.
Put this to one side and configure PiServer. On the server computer launch PiServer from the Preferences menu. Follow the instructions in the wizard to set up the network. You should see the MAC address of each Raspberry Pi 3 B+ on the network in the Add clients screen; proceed to the Add users screen to create one or more user accounts and passwords.
Note: More can be added later. Also, the accounts are portable, and not locked to specific Raspberry Pis.
Click next to Add software, and select the operating system you wish each client to use. Currently, Raspbian and Raspbian Lite are available. Click Next to complete the procedure, install the client operating systems, and finish.
Simple Raspberry Pi Servers Without MicroSD Cards
By now, you should have at least one Raspberry Pi 3 B+ running as a zero client, and a PC running the Debian Stretch distro for 32-bit computers. The end result is a simplified, networked, Raspberry Pi environment that is centrally controlled and doesn’t require a microSD card.
It may not be ideal for offline projects, or many online projects, but as a solution to many computing tasks, network booting a Raspberry Pi 3 B+ is ideal. You might have a home server to connect your Raspberry Pi to, or use PiServer as a central server in a classroom scenario. PiServer might even control a bunch of Raspberry Pis using Power over Ethernet (PoE) in an industrial scenario. It’s all pretty exciting, isn’t it?
Want more Raspberry Pi server solutions? This little computer is capable of so much, from Raspberry Pi media servers to Raspberry Pi web hosting servers!
Read the full article: How to Network Boot a Raspberry Pi Without a MicroSD Card
from MakeUseOf https://ift.tt/2KbicFX

No comments:
Post a Comment