Do you want to create an instrumental version of your favorite song? Perhaps you need to make a backing track? Or do you have a song you produced but don’t have the original tracks for, and need to make a change to the vocal track?
Whatever the case, you can remove the vocals from any song with Audacity, a free and open source digital audio workstation. And in this article we’ll detail how to achieve this.
What to Know Before Removing Vocals From Songs
Before we proceed, let’s get a few things out of the way.
If you’re going to strip vocals from songs you don’t own, then that needs to be for personal use only. Using a self-made voice-free version of a track (e.g. as a backing track for a live performance) wouldn’t be appropriate.
On the other hand, you might have some self-made audio that you need to strip voice from in order to create some ambience. Or you may have some original music that you’ve lost the original recordings for, and need to remove the vocals.
With Audacity, you have a couple of different ways to remove vocal tracks from a song, depending on how the vocals are placed in the mix:
- Vocals in the middle: Most songs are mixed in this way, with the voice in the center, or just slightly to the left or right, with instruments around them, creating the stereo effect.
- Vocals in one channel: Typically songs from the 1960s use this approach, when stereophonic sound was still being explored in the studio.
We’ll look at applying each of these options below. Don’t forget to head to the Audacity website to download and install your own copy of Audacity (for Windows, Mac, or Linux) before proceeding. If you have a copy already, make sure you’re using the feature-packed Audacity 2.2.0 (or later).
Vocal removal in Audacity is possible thanks to a built-in function, making it just as simple as removing background noise from an audio track.
Note: In addition to these native options, you can also use these third-party voice removal plugins to remove vocals from a track. Each has its own instructions for applying the filter to remove vocals.
Stereo Track Vocal Removal With Audacity

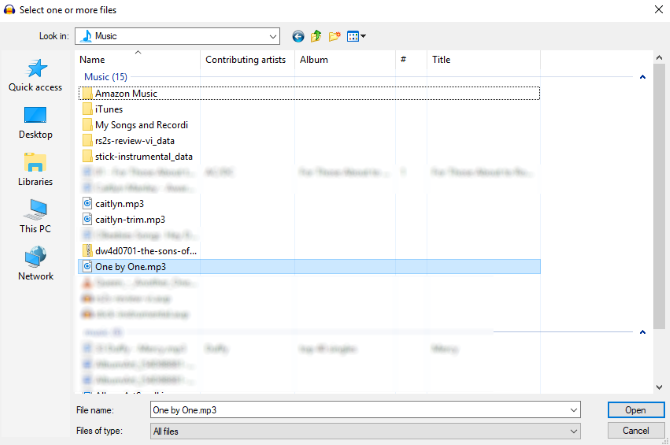
Begin by opening the audio file you wish to edit (File > Open).
Once loaded, play the track; make sure you can identify the areas where vocals appear. It’s a good idea to have some familiarity with the track before proceeding.

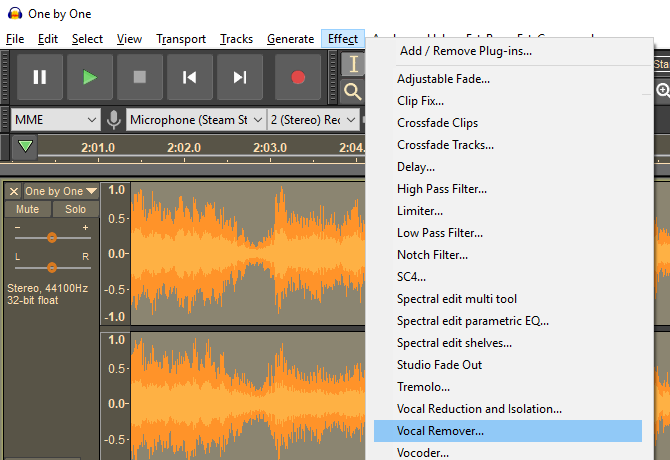
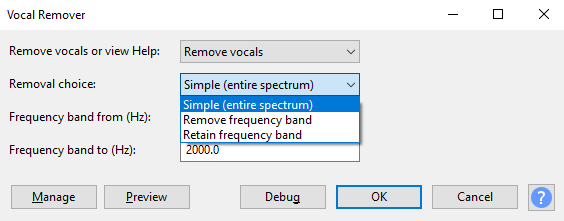
Next, select the track (click the header on the left, or press Ctrl + A) and choose Effects > Vocal Remover. You have three options for removal: Simple, Remove frequency band, and Retain frequency band. Start with Simple, and use the Preview button to check how this might be applied.

If you’re satisfied, click OK to proceed; otherwise, try the other options, previewing the track until you’re happy with the expected results. Note that if you accidentally apply vocal removal with the wrong settings, you can undo it with Ctrl + Z or Edit > Undo.
When you’re done, use the File > Save Project option to retain the changes. To create a new MP3 file, use File > Save other > Export as MP3.
Note that you’ll probably never achieve a perfect vocal-free track. You’ll need to accept a trade-off between some vocal artefacts and a lower quality, muddier instrumental track.
Removing Vocals From Stereo/Mono Dual Track
If the mix has the vocals on one channel, it’s far easier to strip them away.
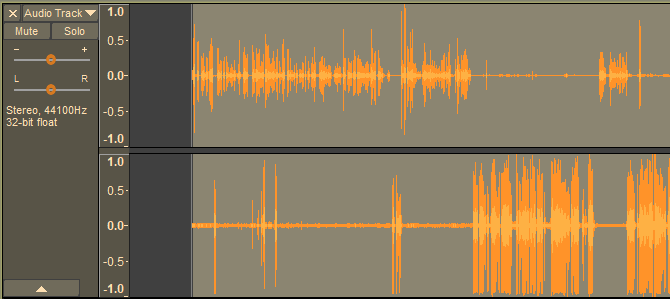
Begin by finding the Audio Track dropdown menu on the track header, and selecting Split stereo track. This will create a second track for your audio. Play the audio, using the Mute button on each track to determine which track is carrying the vocals.

Once you’ve worked it out, all you need to do next is delete the channel with the vocals on. Click X on the track header to do this. Again, listen back to the track to check the results are to your approval.
While a simpler and more effective option than using the Vocal Remover tool, this method can only be used on comparatively few songs.
Need Vocal-Free Music? Try These Options
Using Audacity (or an Audacity alternative) isn’t the only way to strip vocals from audio. It’s a good DIY option, but if you’re dissatisfied with the results, you may be end up frustrated.
The good news is, it isn’t uncommon for songs to be released with accompanying instrumental tracks. Such tracks are often found on special edition albums. Some movie soundtracks might also feature instrumentals of featured songs.
You might also consider the easier option of getting hold of some karaoke tracks. Many of these can be found on YouTube, although there are various other places where you can get hold of them. Karaoke tracks are still sold on CD too, so don’t overlook this old-school option.
More Options That Aren’t Audacity
By now you should have successfully removed the vocal track from your song of choice. The results may be good or not so good, but either way the vocals will be gone.
Alternatively, you might have preferred to track down a karaoke CD with the same song included, vocals already removed. Or you’ve found an instrumental version of the song in question.
However, if you’ve done it yourself using Audacity, just consider how powerful this free piece of software is. In short, it’s as versatile as the various paid alternatives, such as Adobe Audition. Audacity does far more than vocal removal, too.
We’ve previously looked at how to use Audacity, which can be used for editing podcasts, converting vinyl albums to MP3, and creating sound effects.
Read the full article: How to Remove the Vocals From Any Song Using Audacity
from MakeUseOf https://ift.tt/2J74kbo

No comments:
Post a Comment